If you are a distro hopper like me, you probably already have a VirtualBox set up with countless distributions. VirtualBox is a safer, easier and awesome application to try out different Linux flavors.
However, VirtualBox does have some limitation. The fact that it runs on top of your base OS may lead to resource crunch. You may need to run it on real hardware to check if a distro satisfies your requirement and is fun.
UnetBootin is a GUI tool that does exactly the same. It can be used to create a Linux bootable USB from which you can boot in live mode and try a distribution. You can even go ahead and install it if you wish. Another way is through using dd linux command to burn an ISO to a USB drive and then use it.
In this article, we will see how to create a bootable Linux USB using both the method.
Using UnetBootin
In order to use UnetBootin, download a copy from the its github site. It’s available for Windows, Mac and Linux flavours.
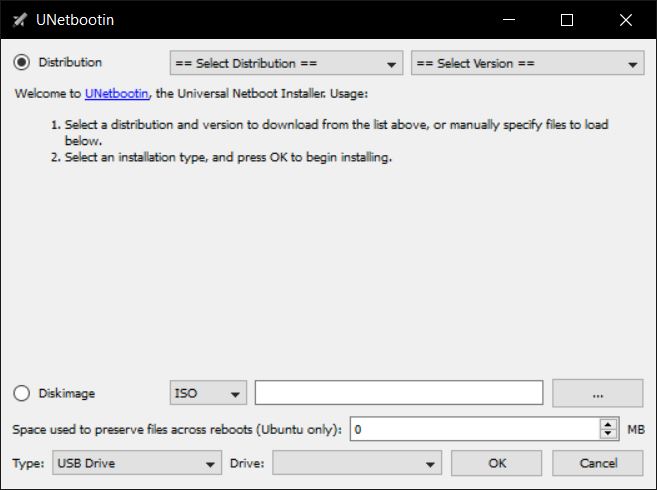
Once downloaded, launch the application. Homescreen looks something like this.

You can either download a distribution ISO from the application itself or use your own ISO to burn it. Under Distribution, there is a list of distros to choose from. You can alternatively choose the ISO location by select Diskimage.
Once done, select the target USB drive and Click on OK to continue with burning of the ISO.
Once installation completes, you can use the USB device to boot to the installed Linux distribution. Some manufacturers do not allow the default booting from USB drive. You can access the menu during booting process by pressing escape or F12 and then choosing USB as the primary booting device.
In case the USB drive is not detected, UnetBootin suggests to format it with FAT32 filesystem.
Another such application is Rufus which can be used to create a bootable Linux USB.
Using Linux command line
dd is a command line utility for Unix and Linux for converting and copying files. It is one of best way to create a bootable Linux USB drive without installing any third-party application; all you need is a USB and a terminal.
Prerequisite : Download and place the linux ISO file to any location.
First of all, you have to find out the USB drive details and then unmount it. lsblk gives these details.
lsblk
Output :
sdb      12:16   1  14.9G  0 disk
 ├─sdb1   12:17   1   7.6G  0 part /media/ambarish/usb volume name
 └─sdb2   12:18   1   2.6M  0 part
To dismount, type in terminal
sudo umount /dev/sdb1
Once the USB drive is unmounted, you can use the below command to write the content of ISO to the drive.
sudo dd bs=4M if=/path/of/Linux.ISO of=/dev/sdb1 conv=fdatasync status=progress
Note : This is a irreversible process and wipes out the USB drive data. Make sure if you have nothing important on the drive.
Once done, you can use the USB drive to boot and use the Linux distribution.
Wrapping Up
Though graphical method provides an easier way to create a bootable USB without the hassle of dealing with terminal, most of the Linux users prefer the later. Which one do you prefer? Let us know in the comments.


Shadow
Hi, I have noticed a typo in one of your commands.
It should be ‘umount’ not ‘unmount’ in the command for unmounting pen drive.
Ambarish Kumar
Thank you, I have corrected it now.
Jan Greeff
Startup Disk Creator comes with the standard Ubuntu installation, is easy and simple to use and works perfectly for me.
Ambarish Kumar
Thank you, Jan. Yes, there are so many good tools to create a bootable USB running Linux that I am planning to list’em in a separate article.
Keep reading thelinuxuser.
Dimitris Anogiatis
Usually UnetBootin would actually do the trick IF it didn’t have the habbit of messing around with the GRUB menu of any distro you try to write on a thumbdrive
I would instead use Balena Etcher
Ambarish Kumar
It does look interesting. Thanks for the suggestion!